
H1Intro
Next.js is a framework for building fast & search-engine-friendly applications.
By framework, we mean Next.js handles the tooling and configuration needed for React and provides additional structure, features, and optimizations for your application.
You can use React to build your UI, then incrementally adopt Next.js features to solve common application requirements such as routing, data fetching, integrations - all while improving the developer and end-user experience.
H1How Next.js Works
H2Development & Production Environments
During development, you’re building and running the application on your local machine. Going to production is the process of making your application ready to be deployed and consumed by users.
H3How this applies to Next.js
Development: Next.js optimizes for the developer and their experience building the application. It comes with features that aim to improve the Developer Experience, such as the built-in TypeScript and ESLint integrations, Fast Refresh, and more.
Production: Next.js optimizes for the end-users, and their experience using the application. It aims to transform the code to make it performant and accessible.
H2Compiling
Developers write code in languages that are more developer-friendly such as tsx, TypeScript, and modern versions of JavaScript. While these languages improve the efficiency and confidence of developers, they need to be compiled into JavaScript before browsers can understand them.
H2Minifying
Developers write code that is optimized for human readability. This code might contain extra information that is not necessary for the code to run, such as comments, spaces, indents, and multiple lines. The goal is to improve the application’s performance by decreasing file sizes.
H2Bundling
Bundling is the process of resolving the web of dependencies and merging (or ‘packaging’) the files (or modules) into optimized bundles for the browser, with the goal of reducing the number of requests for files when a user visits a web page.
H2Code Splitting
Developers usually split their applications into multiple pages that can be accessed from different URLs. Each of these pages becomes a unique entry point into the application.
Code-splitting is the process of splitting the application’s bundle into smaller chunks required by each entry point. The goal is to improve the application's initial load time by only loading the code required to run that page.
H2Build Time & Runtime
Build time (or build step) is the name given to a series of steps that prepare your application code for production.
Runtime (or request time) refers to the period of time when your application runs in response to a user’s request.
H2Client & Server
Client refers to the browser on a user’s device that sends a request to a server for your application code.
Server refers to the computer in a data center that stores your application code, receives requests from a client, does some computation, and sends back an appropriate response.
H2Rendering
With Next.js, three types of rendering methods are available: Server-Side Rendering (SSR), Static Site Generation (SSG), and Client-Side Rendering (CSR).
H3Client-Side Rendering
The initial rendering work happens on the user's device.
If the component needs user action or needs to run on the client side just write 'use client' on the top of the file.
H3Server-Side Rendering
With server-side rendering, the HTML of the page is generated on a server for each request. The generated HTML, JSON data, and JavaScript instructions are then sent to the client to make the page interactive.
On the client, the HTML is used to show a fast non-interactive page, while React uses the JSON data and JavaScript instructions to make components interactive (for example, attaching event handlers to a button). This process is called hydration.
In Next.js, you can opt to server-side render pages by using getServerSideProps.
H3Static Site Generation
With Static Site Generation, the HTML is generated on the server, but unlike server-side rendering, there is no server at runtime. Instead, content is generated once, at build time, when the application is deployed, and the HTML is stored in a CDN and re-used for each request.
In Next.js, you can opt to statically generate pages by using getStaticProps.
H2CDNs & the Edge
Your application code can be distributed to origin servers, Content Delivery Networks (CDNs), and the Edge
H3Origin Servers
The server refers to the main computer that stores and runs the original version of your application code.
H3Content Delivery Network
CDNs store static content (such as HTML and image files) in multiple locations around the world and are placed between the client and the origin server. When a new request comes in, the closest CDN location to the user can respond with the cached result.
This reduces the load on the origin because the computation doesn’t have to happen on each request. It also makes it faster for the user because the response comes from a location geographically closer to them.
H3The Edge
Similar to CDNs, Edge servers are distributed to multiple locations around the world. But unlike CDNs, which store static content, some Edge servers can run small snippets of code. This means both caching and code execution can be done at the Edge closer to the user.
H1Navigation
Pages are associated with a route based on their file name. For example, in development:
app/page.tsxis associated with the/route.app/posts/page.tsxis associated with the/postsroute.
H2<Link>
In Next.js, you can use the Link Component next/link to link between pages in your application. <Link> allows you to do client-side navigation and accepts props that give you better control over the navigation behaviour.
tsx
import Link from "next/link";
<Link href="/posts/first-post">this page!</Link>;
Note:
- It's not allowed to nest a <Link> within another <Link>.
H3href (required)
href can also accept an object, for example:
tsx
// Navigate to /about?name=test
<Link
  href={{
    pathname: "/about",
    query: { name: "test" },
  }}
>
  About
</Link>H2Client-Side Navigation
Client-side navigation means that the page transition happens using JS, which is faster than the default navigation done by the browser. Because default navigation requires an HTTP request between the browser and the server.
H2Prefetching
In a production build of Next.js, whenever Link components appear in the browser’s viewport, Next.js automatically prefetches the code for the linked page in the background. By the time you click the link, the code for the destination page will already be loaded in the background, and the page transition will be near-instant!
H2useRouter
js
const router = useRouter();
router.push(href);H1Assets, Metadata, and CSS
H2Assets - <Image>
Next.js can serve static assets, like images, under the top-level public directory.
Next.js also has support for Image Optimization by default. This allows for resizing, optimizing.
Automatic Image Optimization works with any image source.
Images are lazy loaded by default. That means your page speed isn't penalized for images outside the viewport. Images load as they are scrolled into viewport.
tsx
<Image
  src="/images/profile.jpg" // Route of the image file
  height={144} // Desired size with correct aspect ratio
  width={144} // Desired size with correct aspect ratio
  alt="Your Name"
/>
Note:
heightandwidthare required, you can also write as follows tho:
tsx
<Image
  src="/images/profile.jpg" // Route of the image file
  fill
  size="100%"
  alt="Your Name"
  style={{ objectFit: "contain" }}
/>H3Usage
Local Images (relative path):
tsx
<Image
  src="/xxx/yyy.png"
  alt="Picture of the author"
  // width={500} automatically provided
  // height={500} automatically provided
  // blurDataURL="data:..." automatically provided
  // placeholder="blur" // Optional blur-up while loading
/>
Tips:
publicfolder is the root path for every static asset. So you don't need to writesrc="/public/xxx/yyy.png"or evenhttps://example.com/....
Remote Images (absolute path):
tsx
<Image
  src="https://s3.amazonaws.com/my-bucket/profile.png"
  alt="Picture of the author"
  width={500}
  height={500}
/>H3Property: fill
Please note, if height and width are unknown, we can use fill property.
The parent element must assign position: "relative", position: "fixed", or position: "absolute" style.
If no styles are applied to the image, the image will stretch to fit the container. You may prefer to set object-fit: "contain" for an image which is letterboxed to fit the container and preserve aspect ratio.
H2Property: sizes
H2Metadata - <Head>
What if we wanted to modify the metadata of the page, such as the <title> HTML tag?
tsx
import Head from "next/head";
<Head>
  <title>Create Next App</title>
  <link rel="icon" href="/favicon.ico" />
</Head>;H2Third-Party JavaScript - <Script>
tsx
import Script from "next/script";
<Script
  src="https://connect.facebook.net/en_US/sdk.js"
  strategy="lazyOnload"
  onLoad={() =>
    console.log(`script loaded correctly, window.FB has been populated`)
  }
/>;
Notice that a few additional properties have been defined in the Script component:
strategycontrols when the third-party script should load. A value oflazyOnloadtells Next.js to load this particular script lazily during browser idle timeonLoadis used to run any JavaScript code immediately after the script has finished loading. In this example, we log a message to the console that mentions that the script has loaded correctly
H2CSS modules
CSS Modules allow you to locally scope CSS at the component-level by automatically creating unique class names. This allows you to use the same CSS class name in different files without worrying about class name collisions.
H2Global Styles
If you want some CSS to be loaded by every page, Next.js has support for that as well. To load global CSS to your application, create a file called pages/_app.js with the following content:
tsx
// `pages/_app.js`
import "../styles/global.css";

export default function App({ Component, pageProps }) {
  return <Component {...pageProps} />;
}H1Pre-rendering and Data Fetching
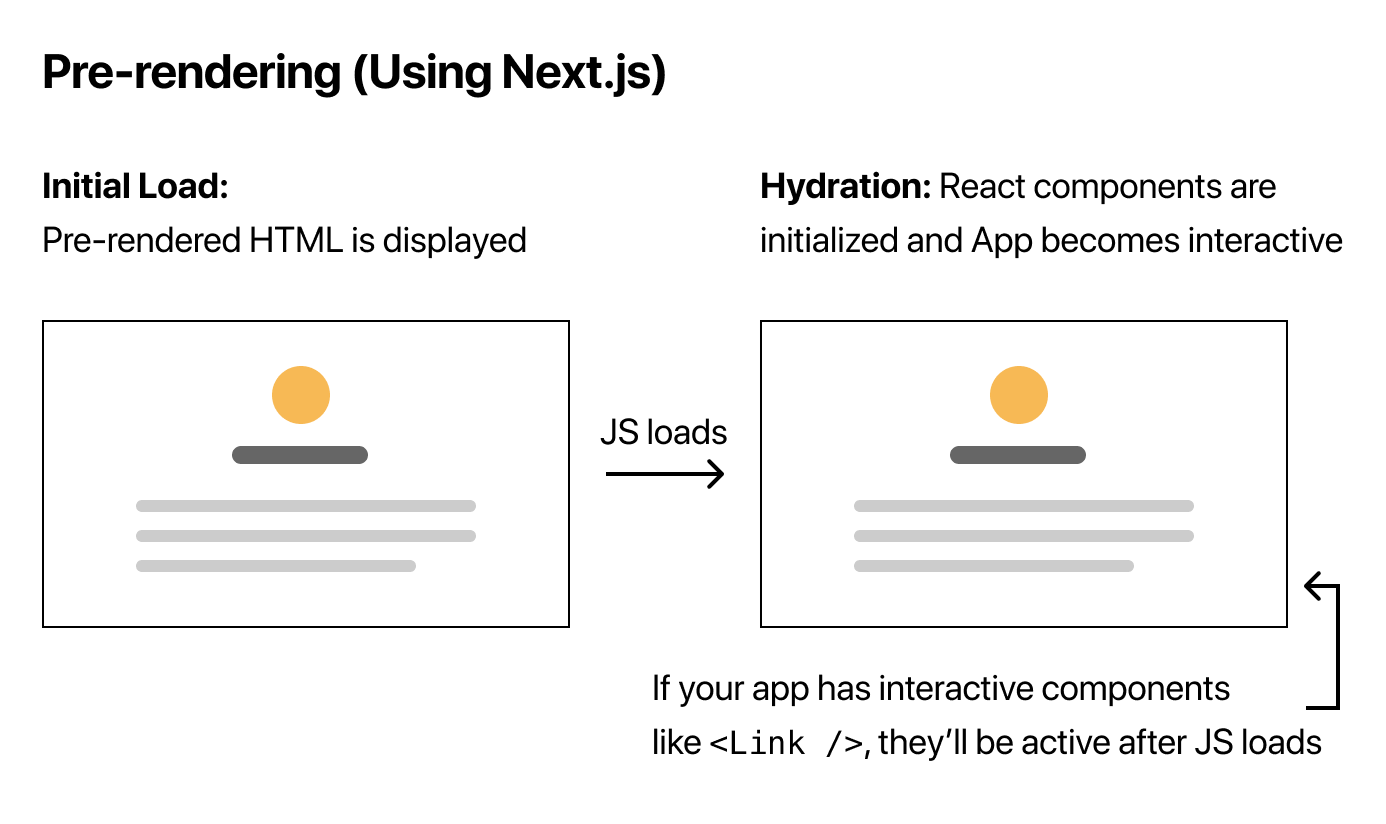
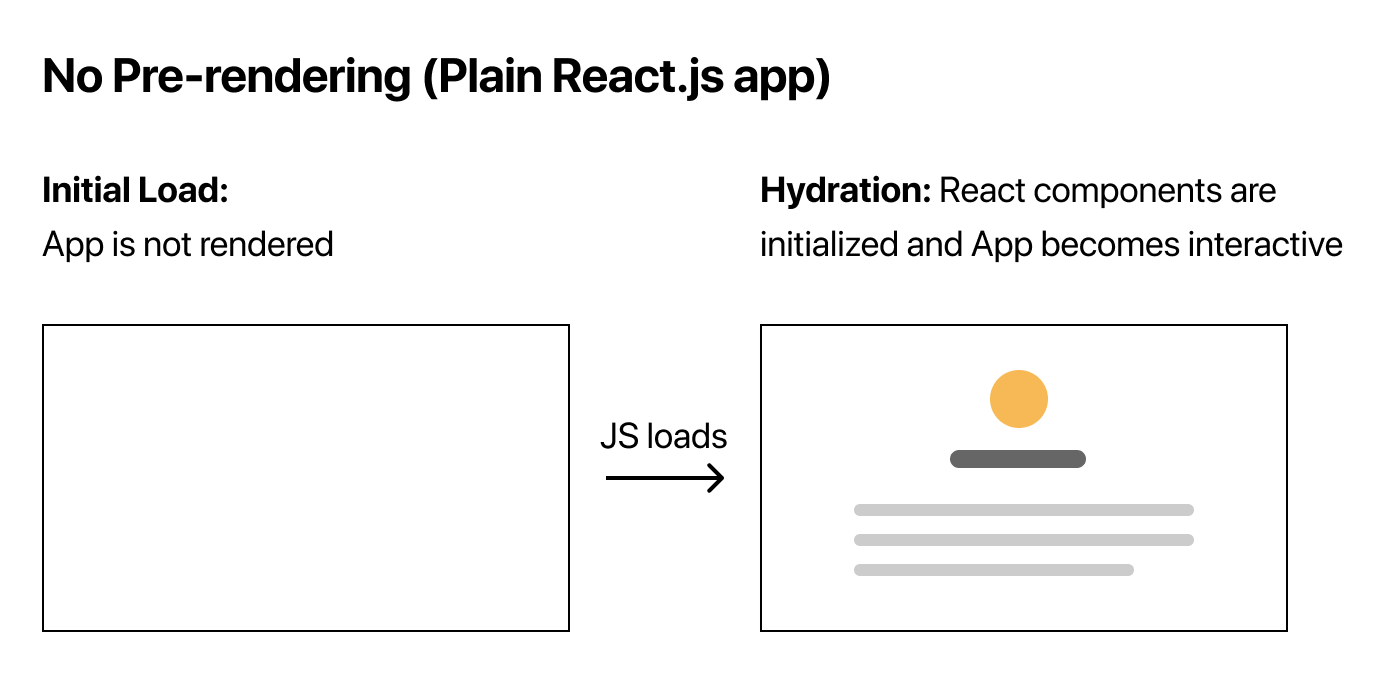
By default, Next.js pre-renders every page. This means that Next.js generates HTML for each page in advance, instead of having it all done by client-side JavaScript. Pre-rendering can result in better performance and SEO.
Each generated HTML is associated with minimal JavaScript code necessary for that page. When a page is loaded by the browser, its JavaScript code runs and makes the page fully interactive. (This process is called hydration.)
H2Pre-rendering
H3Pre-rendering vs No Pre-rendering
H3When to Use Static Generation v.s. Server-side Rendering
We recommend using Static Generation (with and without data) whenever possible because your page can be built once and served by CDN, which makes it much faster than having a server render the page on every request.
You can use Static Generation for many types of pages, including:
- Marketing pages
- Blog posts
- E-commerce product listings
- Help and documentation
You should ask yourself: "Can I pre-render this page ahead of a user's request?" If the answer is yes, then you should choose Static Generation.
On the other hand, Static Generation is not a good idea if you cannot pre-render a page ahead of a user's request. Maybe your page shows frequently updated data, and the page content changes on every request.
In that case, you can use Server-side Rendering. It will be slower, but the pre-rendered page will always be up-to-date. Or you can skip pre-rendering and use client-side JavaScript to populate frequently updated data.
H2Static Generation with and without Data
Static Generation can be done with and without data.
For some pages, you might not be able to render the HTML without first fetching some external data. Maybe you need to access the file system, fetch external API, or query your database at build time. Next.js supports this case — Static Generation with data — out of the box.

H3SSG with Data using getStaticProps
in Next.js, when you export a page component, you can also export an async function called getStaticProps. If you do this, then:
getStaticPropsruns at build time in production, and…- Inside the function, you can fetch external data and send it as props to the page.
tsx
export default function Home(props) { ... }

export async function getStaticProps() {
  // Get external data from the file system, API, DB, etc.
  const data = ...

  // The value of the `props` key will be passed to the `Home` component
  return {
    props: ...
  }
}
Note: In development mode,
getStaticPropsruns on each request instead.
You can fetch the data from other sources, like an external API endpoint, and it’ll work just fine:
tsx
export async function getSortedPostsData() {
  // Instead of the file system,
  // fetch post data from an external API endpoint
  const res = await fetch("..");
  return res.json();
}Note: Next.js polyfills
fetch()on both the client and server. You don't need to import it.
H3Only Allowed in a Page
getStaticProps can only be exported from a page. You can’t export it from non-page files.
One of the reasons for this restriction is that React needs to have all the required data before the page is rendered.
H1Routing
H2Pages and Layouts
H3Layouts
You can define a layout by default exporting a React component from a layout.js file. The component should accept a children prop that will be populated with a child layout (if it exists) or a child page during rendering.

tsx
export default function DashboardLayout({
  children, // will be a page or nested layout
}: {
  children: React.ReactNode;
}) {
  return (
    <section>
      {/* Include shared UI here e.g. a header or sidebar */}
      <nav></nav>

      {children}
    </section>
  );
}H2Route Groups
Scenario: When you want to organise your route segments and project files into logical groups without affecting the URL path structure.
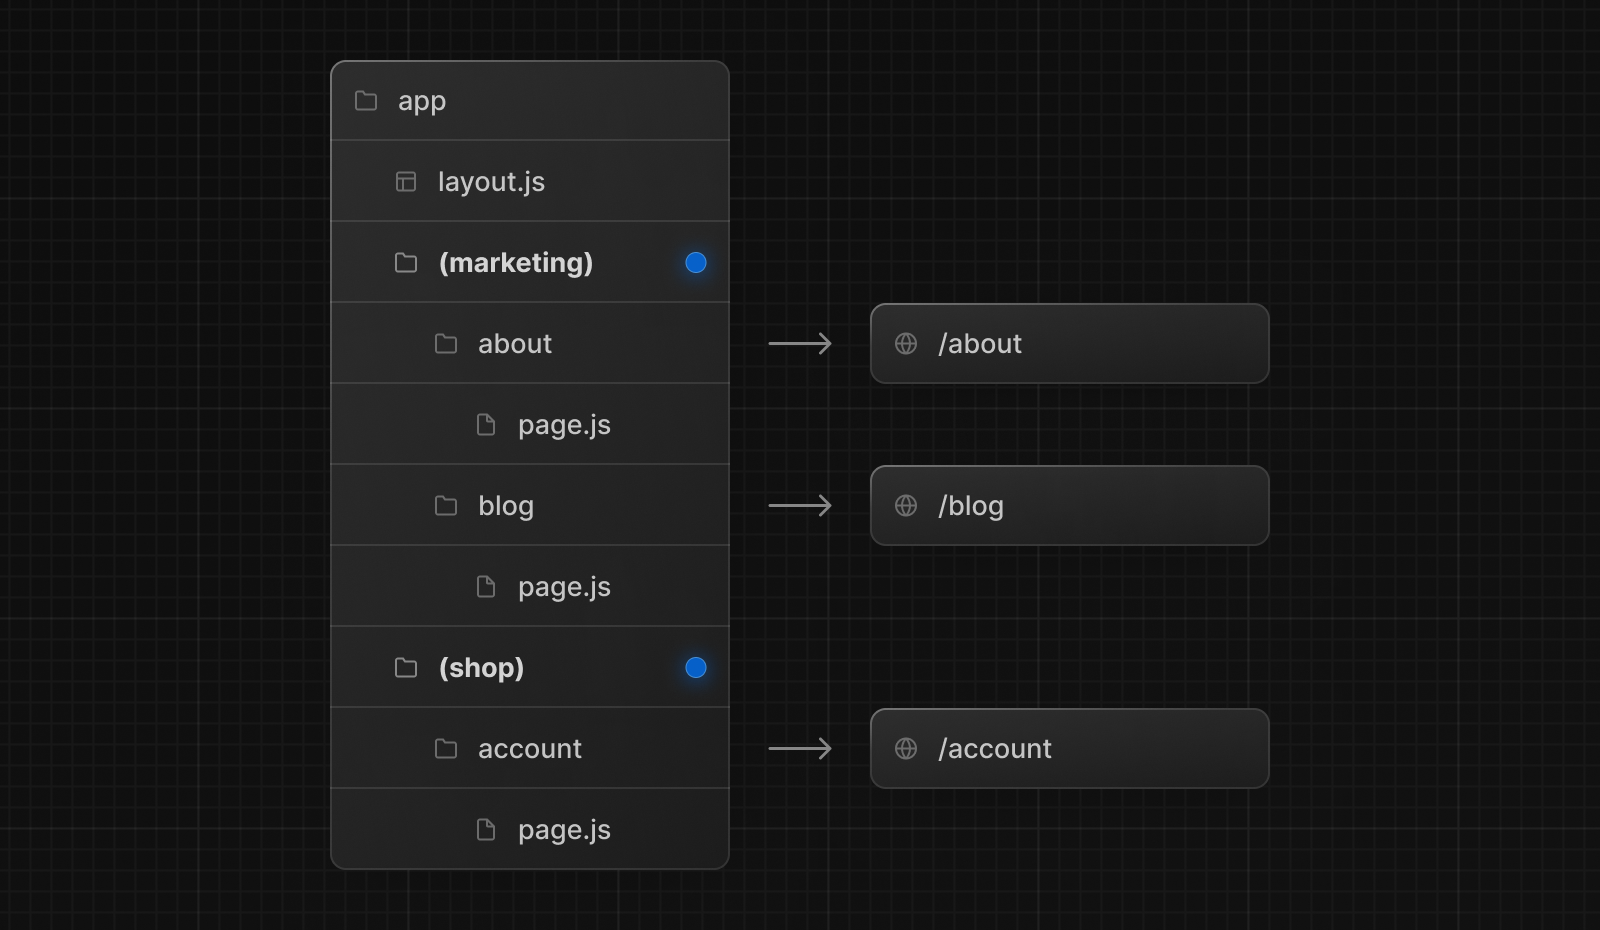
Even though routes inside (marketing) and (shop) share the same URL hierarchy, you can create a different layout for each group by adding a layout.js file inside their folders.
To create multiple root layouts, remove the top-level layout.js file, and add a layout.js file inside each route groups.
H2Route Handlers
app/api/route.ts
ts
export const dynamic = "force-dynamic"; // defaults to auto
export async function GET(request: Request) {}H1Data Fetching
H2Fetching, Caching, and Revalidating
H3Fetching Data on the Client with Route Handlers
If you need to fetch data in a client component, you can call a Route Handler from the client. Route Handlers execute on the server and return the data to the client. This is useful when you don't want to expose sensitive information to the client, such as API tokens.
H1Dynamic Routes
H2How to Statically Generate Pages with Dynamic Routes
In Next.js 13, getStaticPaths function is no longer used. We use generateStaticParams instead.
The generateStaticParams function can be used in combination with dynamic route segments to statically generate routes at build time instead of on-demand at request time.
app/blog/[slug]/page.js:
js
// Return a list of `params` to populate the [slug] dynamic segment
export async function generateStaticParams() {
  const posts = await fetch("https://.../posts").then((res) => res.json());

  return posts.map((post) => ({
    slug: post.slug,
  }));
}

// Multiple versions of this page will be statically generated
// using the `params` returned by `generateStaticParams`
export default function Page({ params }) {
  const { slug } = params;
  // ...
}H1Optimizing
H2Fonts
H3Google Fonts
Next.js automatically self-host any Google Font.
I show two ways of using Google fonts in Next.js as follows.
tsx
const inter = Inter({
  subsets: ["latin"],
  variable: "--font-inter",
  display: "swap",
});

<main className={inter.className}>
  <h1 className={`${inter.variable}`}>title</h1>
</main>;
scss
h1 {
  font-family: var(--font-inter);
}H2Local Fonts
tsx
import localFont from "next/font/local";

// Font files can be colocated inside of `app`
const myFont = localFont({
  src: "./my-font.woff2",
  display: "swap",
});H1Configuring
H2MDX
MDX is a superset of markdown that lets you write JSX directly in your markdown files.
H1File Conventions
H2page.js
params and searchParams are page.js props. So you don't have to use useParams etc in page.js.
H2layout.js
H2loading.js
Just create loading.js or .tsx in /app path.
/app/loading.tsx
tsx
export default function Loading() {
  return <p>Loading...</p>;
}
/app/layout.tsx
tsx
<Suspense fallback={<Loading />}>{children}</Suspense>H2not-found.js
Just create not-found.js or .tsx in /app path.
H1Functions
H2fetch
Next.js extends the native Web fetch() API to allow each request on the server to set its own persistent caching semantics.
tsx
export default async function Page() {
  // This request should be cached until manually invalidated.
  // Similar to `getStaticProps`.
  // `force-cache` is the default and can be omitted.
  const staticData = await fetch(`https://...`, { cache: "force-cache" });

  // This request should be refetched on every request.
  // Similar to `getServerSideProps`.
  const dynamicData = await fetch(`https://...`, { cache: "no-store" });

  // This request should be cached with a lifetime of 10 seconds.
  // Similar to `getStaticProps` with the `revalidate` option.
  const revalidatedData = await fetch(`https://...`, {
    next: { revalidate: 10 },
  });

  return <div>...</div>;
}H2notFound
Invoke notFound() function can take users to not-found page.
Example:
tsx
if (!postData) {
  notFound();
}H2redirect
syntax: redirect(path, type)
type: 'replace' (default), 'push'
Usage 1:
Your project's path is like/app/movie/[id], and you wanna jump into /movie/1 automatically when you visit the link /movie.
Just create /app/movie/page.tsx
tsx
import { redirect } from "next/navigation";
const page = () => {
  redirect("/movie_reviews/collect");
};
export default page;H1Search Engine Optimization
H2Why is SEO so important?
SEO is the key to increased conversion and confidence in your brand. Higher search ranking placement equates to more organic visitors. Search engine organic traffic – visitors who come to your site through clicking a result in a search engine – is key to many businesses for three reasons:
- Qualitative – Increased chance that visitors turn into customers.
- Trustable – Higher confidence in your brand or mission.
- Low-Cost – Aside from the time and effort spent, having good SEO practices that result in higher search engine ranking is free. There is no direct cost to appear in top organic search results positions.
H2Crawling and Indexing
H3What are HTTP Status Codes?
HTTP response status codes indicate whether a specific HTTP request has been successfully completed.
| HTTP Status Codes | Definition |
|---|---|
| 200 | The HTTP 200 OK success status response code indicates that the request has succeeded. |
| 301/308 | The HTTP 301 Moved Permanently redirect status response code indicates that the resource requested has been definitively moved to the destination URL. |
| 302 | The HTTP 302 Found redirect status response code indicates that the resource requested has been temporarily moved to the destination URL. |
| 404 | The HTTP 404 Not Found client error response code indicates that the server can't find the requested resource. |
| 410 | The HTTP 410 Gone client error response code indicates that access to the target resource is no longer available at the origin server and that this condition is likely to be permanent. |
| 500 | The HTTP 500 Internal Server Error response code indicates that the server encountered an unexpected condition that prevented it from fulfilling the request. |
| 503 | The HTTP 503 Service Unavailable server error response code indicates that the server is not ready to handle the request. |
H1References
Videos:
Docs: